If you're new to the Instant Pot pressure cooker and find yourself confused by all the buttons on the front control panel, this article is for you. It's also for more experienced Instant Pot cooks who perhaps never use the smart programs because they don't know how or why. In this detailed post, we will look at the most common Instant Pot settings and buttons across models, explain how they work and the best ways to use them (as well as when it's better to use the manual settings).
You might be wondering, does anyone actually use all those Instant Pot buttons? Some people find them to be a guiding light and others are put off by just how many there are. It also doesn't help that many recipes designed for the Instant Pot tend to use manual settings rather the pre-programmed options.
We've decided to dive deep into the world of Instant Pot buttons to bring you this definitive guide. This is probably the most in-depth, detailed article on Instant Pot settings on the Internet so we've got some quick links for you to navigate to the button you're most interested in learning about.
You might also want to check out our guide on How To Use The Instant Pot For Beginners here.
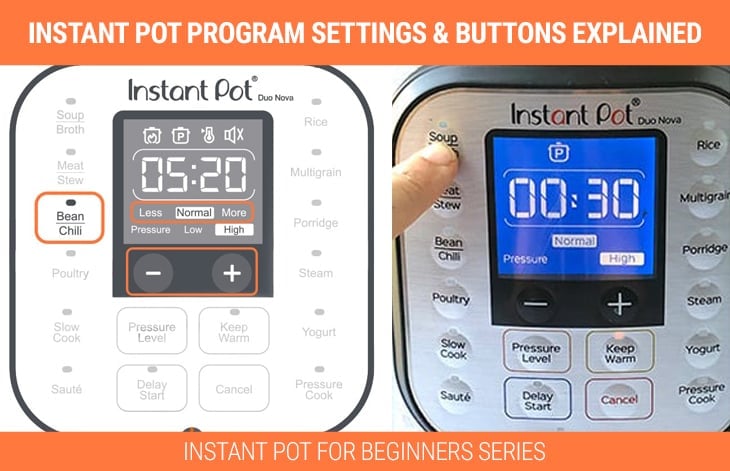
Each Instant Pot setting button is essentially a SMART PROGRAM option. Most smart programs, or buttons, simply set the pot to HIGH or LOW pressure for a specific period of time most closely aligned with the food it is meant to cook. For example, the default SOUP button sets the pressure cooker for 30 minutes at HIGH pressure, which you could use to cook any food that requires that much time and pressure.
If you press each SMART setting button more than once, it will toggle between Normal, Less or More options, which gives you more control of time, temperature or default pressure. For example, the RICE button can be set to Less or More depending on how soft or firm you like your rice or the type of rice you might be cooking.
Some buttons don't use the pressurizing function of the Instant Pot. For example, Slow Cook and Sauté settings use the heating element that sits underneath the inner pot. They are programmed for heat level and time.
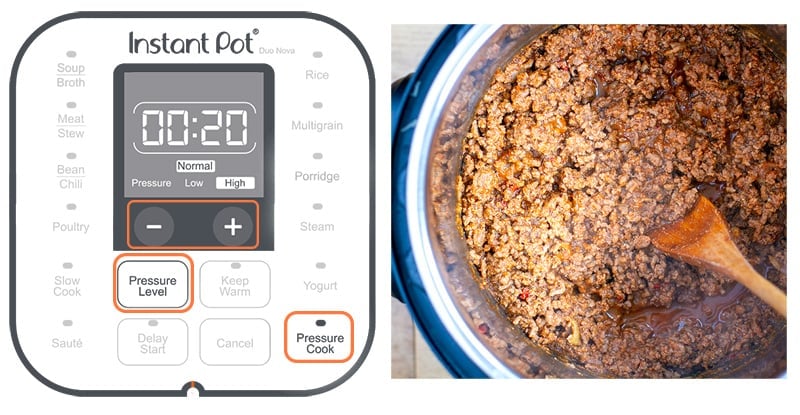
To keep it super simple, it is possible to use the Instant Pot for all recipes using just a few important buttons. With the Pressure Cook or Manual (on older models) buttons in addition to the Pressure Level and [-] and [+] buttons, you can control the time and pressure level which are otherwise preset for the rest of the buttons. This will work for any recipe that requires pressure.
For non-pressure cooking, the Sauté, Slow Cook and Yogurt buttons help you accomplish a similarly custom cooking setting.
Let’s do a quick rundown of all the Instant Pot settings, also known as “one-touch” or “smart” program buttons, on the control panel of Instant Pot Duo Nova & Duo Classic models. The Duo Nova is the recommended Instant Pot for beginners and that's what we used to put together this guide.
Depending on the model, the Instant Pot manual setting button will either say Pressure Cook or Manual. This is the setting you’re likely to use the most. The temperature, pressure level and cooking times can be adjusted on the control panel.
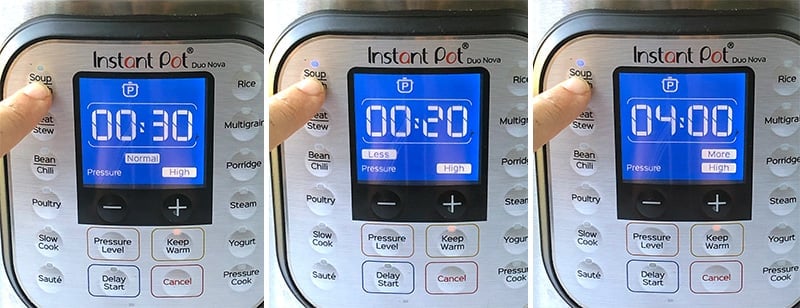
The default Instant Pot soup setting is pre-programmed to set the pot to cook at HIGH pressure for 30 minutes. The soup program brings the contents of the pot to a slow simmer and results in a clear broth due to lack of boiling motion. Below is how to use the Soup/Broth setting on Instant Pot. Check out our 35+ Best Instant Pot Soup Recipes here.
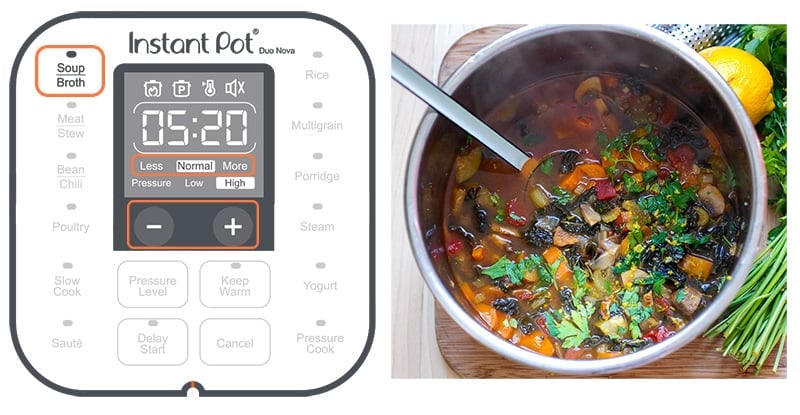
Use the − / + buttons to further customize the time. The cooking time may be adjusted at any time during pressure cooking.
We find that most vegetables, including potatoes, don't need the full 20 minutes at High pressure and will often overcook and get too soft, so for most vegetable-based soups, 5 to 10 minutes at High pressure is usually enough.
If you're cooking something like a beef and vegetable soup, you may choose to pressure cook in two stages: set to cook the meat in a broth with some onions, carrots and celery on Soup/Less mode, then release the pressure and add the rest of the vegetables. Secure the lid again and set on Pressure Cook/Manual or Soup/Less mode and adjust the time to 5 minutes.
Most soups use a lot of liquid, so it is recommended that you release pressure naturally once the cooking timer is done. Simply leave the Instant Pot undisturbed. However, the foods inside keep cooking at a slower rate while the pressure is released. You can always release pressure naturally for 5-10 minutes and then use the quick release method.
Should you sauté first? In some cases, you may want to saute foods like onions, garlic, carrots and celery or to brown the meat first, which can add more flavor to the soup. In this case, press the Sauté setting first and cook off the vegetables in a little oil or fat for 3-4 minutes uncovered. Then add the rest of the ingredients and liquid, secure the lid and choose the Soup setting in whatever mode you like.
The meat and stew setting is best for cooking large or tough cuts of meat at high pressure. This button can be used for cooking meat pieces in a little broth or stews that contain meat in them. Below is how to use the Meat/Stew setting on Instant Pot.
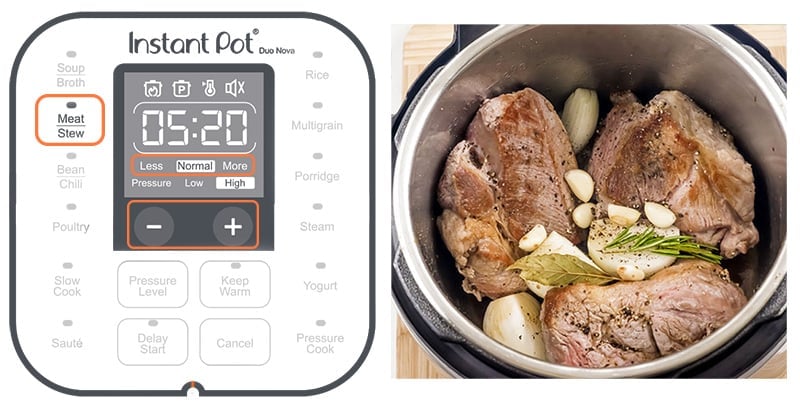
If desired, use the − / + buttons to further customize the time. The cooking time may be adjusted at any time during pressure cooking.
Allow meat to “rest” for 5-30 minutes, depending on size. It will reabsorb cooking juices for tender, succulent meat. Essentially, what this means is that you should allow the Instant Pot to release pressure naturally when possible.
Should you sauté first? In some cases, you may want to brown off the meat first or sauté foods like onions, garlic, carrots and celery, which can add more flavor to the dish In this case, press the Sauté setting first and sear the meat on both sides in a little oil or fat for 1-2 minutes uncovered. Then add the rest of the ingredients and liquid, secure the lid and choose the Meat/Stew setting.
The Bean/Chili setting button can be used to cook larger dry legumes such as beans and chickpeas in liquid or to cook chili or another type of stew that uses dry beans. The program settings (Less, Normal & More) use High pressure and result in different doneness of beans. When cooking beans, always use NR (natural release) to release pressure after cooking is done. Below is how to use the Bean/Chili setting on Instant Pot.
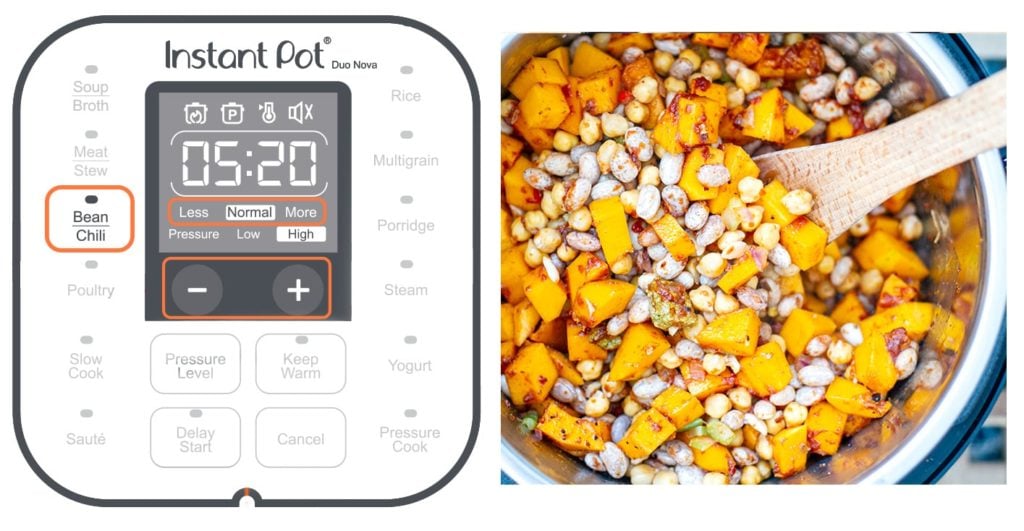
Note: You can also use the Multigrain setting to cook most beans. Check out these Mouthwatering Instant Pot Chili Recipes With A Twist.
The poultry Instant Pot setting is best for cooking. you guessed it. chicken! The mode you choose depends on the size of the chicken pieces and the cut as chicken breast needs less cooking time and is easily overcooked compared to chicken thighs.
You can use this setting to cook chicken meat or a dish that contains poultry in it such as chicken and potatoes or chicken and rice (see more notes on this below). Poultry setting is only available on 6-quart and 8-quart models, not on the mini! Below is how to use the Poultry setting on Instant Pot. Check out our 45+ Best Instant Pot Chicken Recipes here.
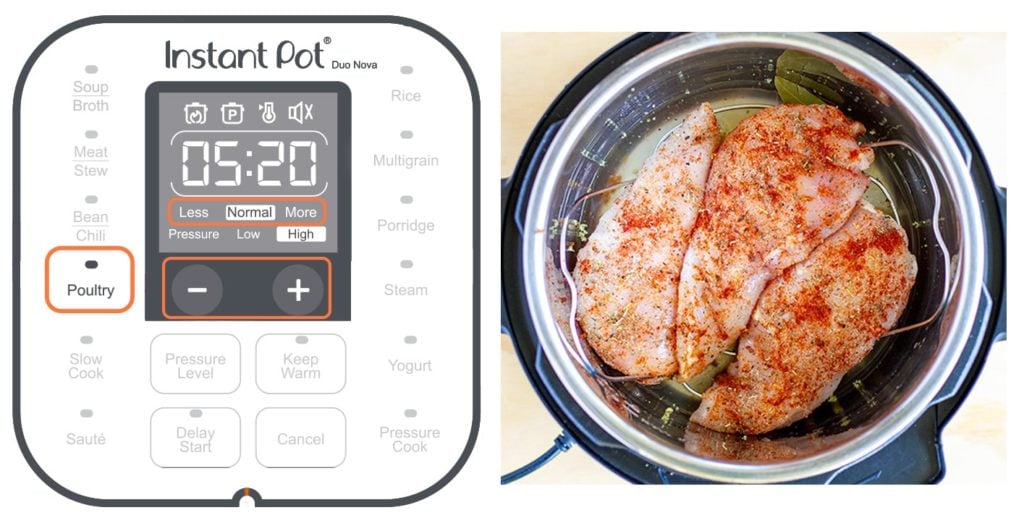
If desired, use the − / + buttons to further customize the time. The cooking time may be adjusted at any time during pressure cooking.
Allow poultry to “rest” for 5-10 minutes, depending on size. It will reabsorb cooking juices for tender, succulent meat. Essentially, what this means is that you should allow the Instant Pot to release pressure naturally when possible.
Should you sauté first? In some cases, you may want to brown off the meat first or sauté foods like onions, garlic, carrots and celery, which can add more flavor to the dish In this case, press the Sauté setting first and sear the meat on both sides in a little oil or fat for 1-2 minutes uncovered. Then add the rest of the ingredients and liquid, secure the lid and choose the Poultry setting.
This button is made for cooking medium and long-grain white rice. The Rice setting uses low pressure and a 10-minute natural release is recommended for perfect results, however, we found that 2-3 minutes natural release followed by quick release is sufficient. Below is how to use the Rice setting on Instant Pot.
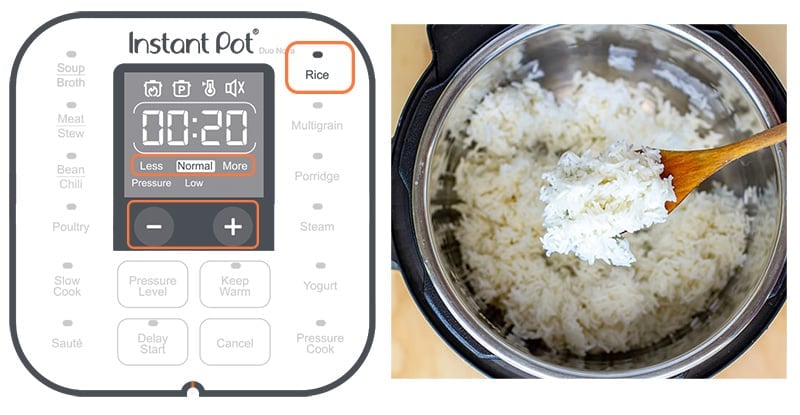
If desired, use the − / + buttons to further customize the time. The cooking time may be adjusted at any time during pressure cooking.
This setting is best suited to cooking tougher, whole grains like brown and wild rice, farro, millet and steel-cut oats; it can also be used to cook dry beans and a mixture of grains and legumes. We find that this is one of the most confusing functions for people because some of the recommended manual cooking times for grains don't match the pre-programmed setting times, so it's hard to know when to use this function. Below is how to use the Multigrain setting on the Instant Pot.
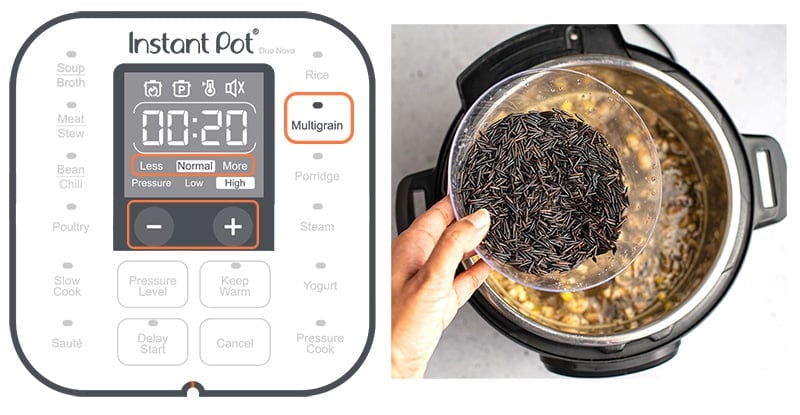
If desired, use the − / + buttons to further customize the time. The cooking time may be adjusted at any time during pressure cooking.
If cooking dry beans, ensure they are completely submerged in water; the same if you're making a mixture of grains and beans.
The porridge setting on the Instant Pot can be used to cook oatmeal using old-fashioned oats and steel-cut oats, rice porridge and congee or porridge-like dishes that use a mixture of grains that expand in liquid. Ideally, you should use natural release when cooking high-starch foods that expand or a combination of 5-10 minutes natural release and quick release to follow. Below is how to use the Porridge setting on Instant Pot.
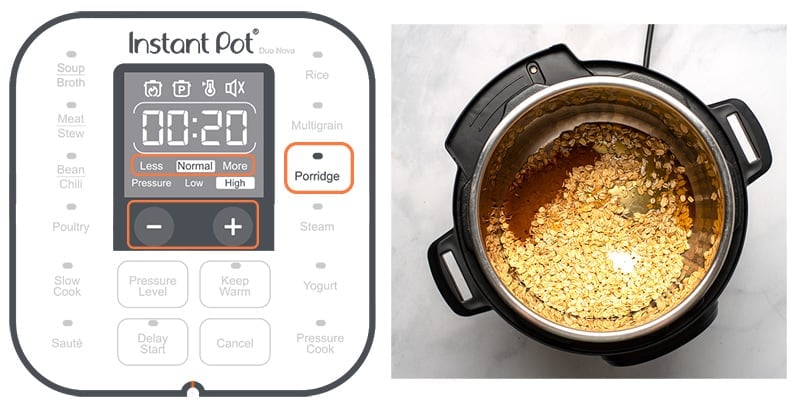
If desired, use the − / + buttons to further customize the time. The cooking time may be adjusted at any time during pressure cooking.
The Steam setting on the Instant Pot is perfect for cooking vegetables, fish and seafood, tofu and any other food that is suitable to steaming. This function uses Low pressure, which helps to avoid overcooking the food and means that the Instant Pot will come to pressure quicker.
You need to use the trivet/steam rack provided to elevate food from cooking liquid. Always use QR (quick release) to prevent food from overcooking. Below is how to use the Steam setting on Instant Pot.

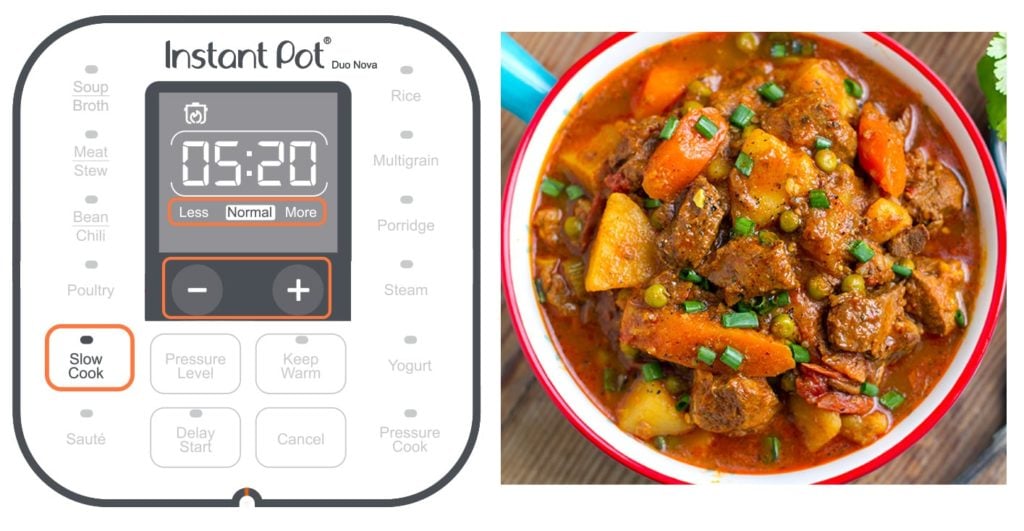
The Slow Cook is a non-pressure cooking setting that is compatible for use with any common slow cooker/Crockpot recipe. The pot is heated but is not pressurized and the Less, Normal and More modes correspond to Low, Medium and High slow cooker settings but you will need to adjust the time manually.
You might want to use this setting for making dishes ahead of time while you're away from home or overnight. There are times when slow-cooking might work better for certain recipes than quicker pressure cooking. Below are the steps for how to use the Slow Cook setting on Instant Pot.
The Sauté is another non-pressure cooking program that can be used in place of a frying pan or flat-top grill. For recipes that call for browned onions or garlic, it’s important to sauté them before adding liquid to the pot as you will release a lot of flavor this way.
Another reason to sauté first is for browning meat. Lastly, sautéeing before cooking is a great way to increase heat and reduce the amount of time your pot will take to come to pressure.
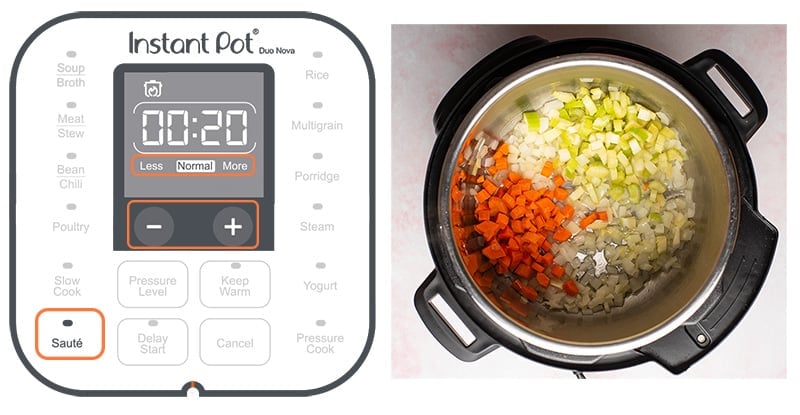
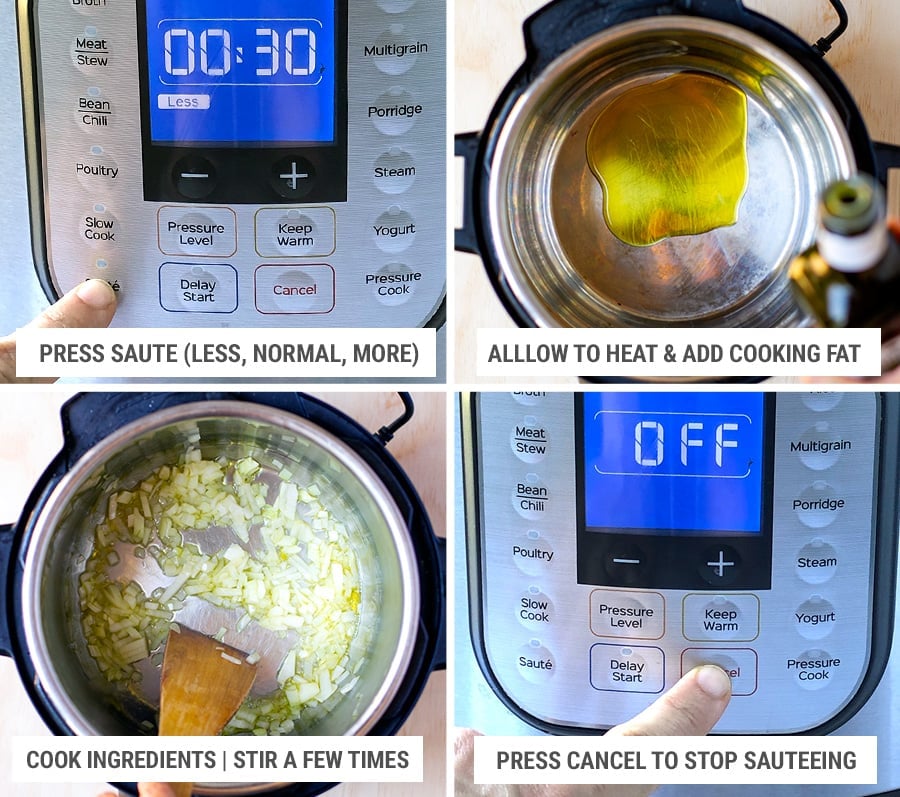
The Sauté function is also useful for finishing the dish after pressure cooking is done. Once the pressure has been completely released, open the lid and then press Sauté button again. Press the button again to cycle through Less or More for lower or higher temperatures.
Use it for:
The Yogurt button is a non-pressure cooking Smart Program made for easily fermented dairy and non-dairy recipes. The setting modes Less, Normal and More are used for different times of fermentation or for boiling (pasteurizing) the milk. Below are some basic steps and setting options for making yogurt using the Yogurt setting button.
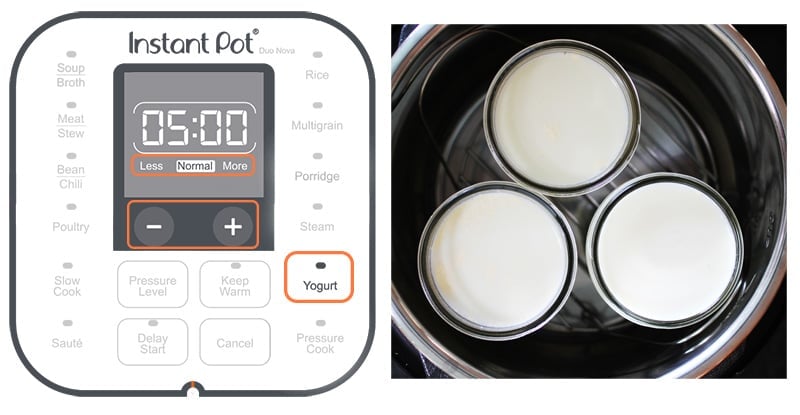
Yogurt cups are a convenient way to portion out your yogurt into individual or smaller servings. After adding the starter culture to the pasteurized or warm milk, carefully pour the milk into your cups and seal them tightly. Clean the inner pot thoroughly and place the steam rack/trivet on the bottom of the inner pot. Place the sealed yogurt cups on the steam rack and add water to the inner pot until the cups are submerged halfway. Follow the steps in “Fermenting Yogurt” above.
This setting keeps the contents of the pot at a low temperature to maintain heat for serving. The Keep Warm setting turns on automatically after cooking on all Smart Programs (including Manual settings) except Sauté and Yogurt. It is set to count up from 00:00 to 10 hours and will then automatically switch off.
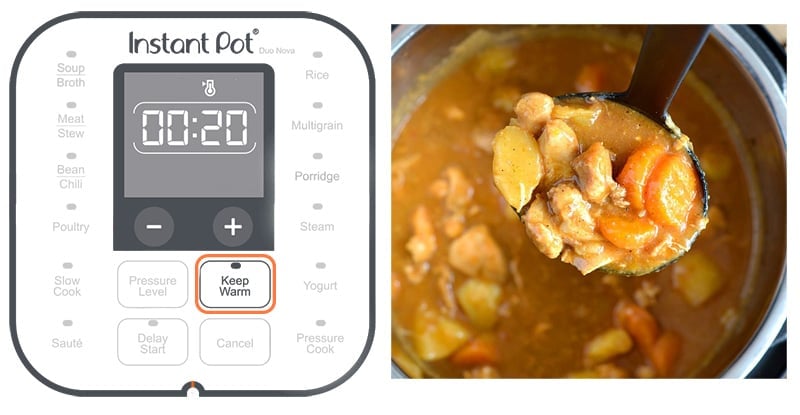
If you don't want to keep the food warm after cooking, you can press the Keep Warm button again to turn it ON or OFF. Do this after you have selected one of the smart programs or manual settings, or at the end of the cooking process.
You can also change the temperature at which the food is kept warm. While in Stand-By mode (when the display shows OFF), press the Keep Warm button to cycle through Normal (145 F), Less (135F) and More (167F) temperature modes. Please note that the temperature will be remembered for next time.
Use the − / + buttons to set a warming timer up to 99 hours and 50 minutes.
This setting button allows you to set the Instant Pot to begin cooking later. It can be set to a minimum of 10 minutes or a maximum of 24 hours.
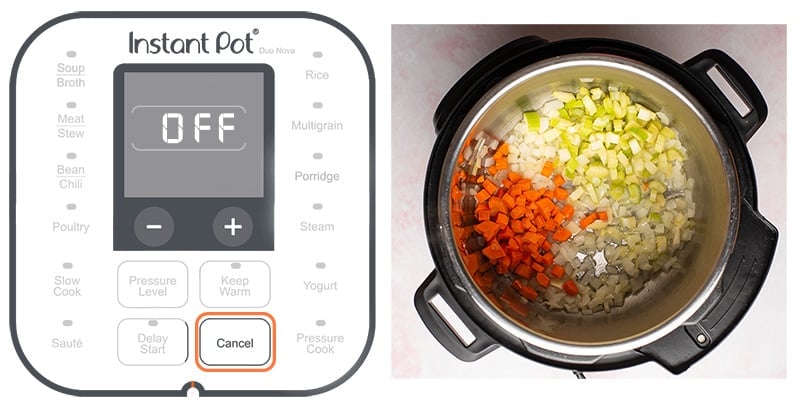
When the cooker is plugged in but not in operation, the display reads OFF to indicate Standby mode. Press Cancel to stop a Smart Program or Manual cooking at any time. The cooker returns to Standby mode.
This high-pressure mode creates a very moist, dense cake. For a lighter, moister cake, use the Less mode; for a denser cake, use the Normal mode; for a really dense cake, such as a New York Style cheesecake, use the More mode. You will need to use a trivet/steam rack and a cake pan, ideally covered with foil. Use Natural Release after cooking is complete.
This program is designed for cooking extra-large eggs, so you may need to adjust the time for smaller eggs. For a soft-cooked egg, use the Less mode; for a medium cooked egg, use the Normal mode; for a hard-cooked egg, use the More mode. Plunge eggs into an ice bath afterwards to prevent overcooking. Use quick release after cooking is complete.
This program is designed for sterilizing baby bottles, jars, and utensils. Use the Less mode (no pressure steam sterilization at 181F) to pasteurize dairy products and sterilize tempered glass and heat-resistant plastics. Normal mode (low pressure hot water bath canning at 230F) or More (high pressure hot water bath canning at 239F) for sterilization of baby bottles, jars, utensils and water-bath canning of acidic fruits and vegetables.
With each new model of the Instant Pot, there seem to be more settings and functions but the good thing is that the most common 9-10 settings are always the same. We hope that this guide has cleared up any confusion you might have had about the Smart program buttons.
As we mentioned at the start, the beauty of the Instant Pot is that you can choose to use the pre-program settings or you can replicate them and have more control with Manual/Pressure Cook settings. Once you understand what they do and experiment with using them for different foods, you will get a better idea of what to use and when.
If you have any further questions about the SMART PROGRAM settings or you've found a new way to use them, let us know in the comments below.
So great article! The book that comes with the Instant Pot is terrible, they should re-print this article in there book instead. However one thing about the slow cooker section, according to Chat GPT (aka internet know it all) : The temperature settings for the "Less," "Normal," and "More" options on the Instant Pot's slow cook mode differ from those of a traditional slow cooker. On the Instant Pot: The "Less" setting is approximately 180-190°F, which is akin to the "Warm" setting on a traditional slow cooker and is not suitable for actual cooking.
The "Normal" setting ranges from 190-200°F, which is similar to the "Low" setting on a traditional slow cooker.
The "High" setting is about 200-210°F, which is more like the medium-high setting on a traditional slow cooker.
In contrast, traditional slow cookers usually operate at around 200°F on the "Low" setting and about 300°F on the "High" setting. This difference in temperature settings means that when using an Instant Pot for slow cooking, you might need to adjust your cooking times and settings accordingly to achieve results similar to a traditional slow cooker I have not tried the slow cooker function yet but the Less setting temperature is too low for low imo.
I tried to get the "Less" option on my IP Duo 5.7L by pressing the Yogurt option, but it just went "High", "Normal", "Boil" and I couldn't reach "Less" - note: I was using the yogurt feature for another fermentation process that required "Less". So how do I get there?
I have an IP Duo 5.7L and cannot get to the "Less" option on yogurt setting. I want to use the setting for fermenting other things and do not need BOIL. How can I circumvent this? Do I need to put a pan of water on to boil for ten minutes in order to be able to change the setting? Appreciate any help.
I dropped the lid of my duo nova 8qt instant pot & not sure if it is working properly. After checking everything I put 2 cups of water & 2 sweet potatoes in for 10 min. The little pot with flame came on & P sign and slowly the float pin rose. It then started to count down the 10 min but the heating symbol (pot with flame) came on & off a couple of times. The float valve did not rise above the lid lip. I felt there was not a lot of steam in the pot as usual when I released the steam vent. Can you help please?
how many PSI is the low, med and high pressure cooking options? High Pressure: 10.2 to 11.6 psiI have a pot full of ingredients to cook beef shanks and NO Meat/Stew button on my cooker!
Not a Word in this artical about any other setting working as a substitute. I am that new to this that I have no idea how to calculate times, levels etc.
No Meat/Stew setting?! Do people only make stew or meat for 2 or 3 people?
Hi. I Have the Duo Nova 8qt model and I make broth all the time. I noticed that the flavor wasn't very strong so I wanted to use the more setting, but it jumps to 4hrs which didn't seem accurate as none of the other settings go over 45 mins. I called Instant Pot and they said I can adjust time manually the first time using soup more setting and it will save the time for future uses. I love your article as it explains how to use the different settings in much more detail then manufacture. I noticed your article states yours says 4 hrs as well. Now I'm very confused as the person I talked to at Instant Pot made it seem like that was a program issue. I wonder what the correct time is supposed to be on soup/broth more. Hoping you can provide much needed clarity. Thank you!
4 hours is the correct pre-programmed setting for Soup/Broth on “more”. It is great for bone broths. You can always adjust the time with the +/- buttons.
I have an older model I suppose. There is no yogurt setting. Can I use the keep warm option and adjust the temperature?
My Instant pot does not have a soup/broth button. What can I use to substitute? Not to worry. Most recipes are developed with Manual Pressure Cooking Button.I couldn't quite understand how to use the pre-programmed settings, and this was so helpful! Making steel cut oats right now. Thank you!
Thanks for this very thorough description of all the IP's settings. some of these I've never been able to understand. I'm a little confused over preparing broccoli the best way. it looks like I can make it using either the standard pressure function or the steam function? Which is better?
You brought my "Duo-Nova instant pot to life" with exactly the understanding I needed, supplied without comprehensive detailed instructions all these buttons meant nothing to me. The instructions they offer with the product are not comprehensive and are printed in a font that young people might be able to see but I certainly cannot. So a big congratulations for this wonderfully comprehensive schedule of instructions. I now have a very solid understanding of this very useful kitchen appliance.
So glad this helped.My instant pot DUO started out at 105 degrees for yogurt and now it's at 110 and killing the yogurt culture which is actually supposed to ferment at 100 degres for L Reuteri yogurt. Is there another setting that will stay at 100 or the low setting?
Hey Jack, sorry I am not sure how to get that set at exactly 100. Might be a good idea to contact the Instant Pot official support team as they would know those ins and outs per specific model.
Jack, the boiling point of milk, as of water, is dependent on atmospheric pressure. The higher you are in relation to sea level, the lower will be the temperature at which the milk will boil. It also happens with me. I leave in a city where the elevation is 1100 meters, and noticed it already in my first time making yogurt. You don't need to do a lot of calculations though, just let the milk cool down a bit once it boils as not to kill the culture. You will soon get a hang of what the ideal temperature is for your case.
I new to instant pot cooking but want to get to grips with caking/ dessert making. I also I want to access the temperature bit.
I have done a lot of searching but have largely been directed to cooking cakes with the pressure cooker bit.
Please help.
Hey Angela, you can't really set an exact temperature on the regular Instant Pot but if you have a Duo Crisp model, you can set it to a particular temperature on Baking setting. Which model do you have?
Can I set the temperature I want when making yogurt? What is the temp of the automatic yogurt button? Thanks,
Julie
Hey Julie, you can't set the exact temperature, however, the pre-set automatic temperature is around 110°F for several hours, which is great for incubating yogurt.
Thanks for all the very helpful info on this site. I wish that this was in th booklet that came with the Instant Pot as I struggled to figure out how to use the buttons before I found your website. My Instant Pot Duo Gourmet doesn't have a cake button. Can you tell me how I can manually set it for cake baking?
Glad the information helped. Generally speaking, it's 35 min for Manual Setting. Make sure to follow the directions of the Instant Pot Cake recipe you are using.
I have a 10 lb bone-in precooked ham. If I heat it in the insta pot will there be enough juice to make gravy with?
It all depends on how much liquid you add. The ham will release some juices while cooking/heating but not a huge amount. You will have to add some water to the pot in order to use the pressure cooking function, so you could add a cup of chicken stock. It will then incorporate any ham juices as well and you can use that for gravy.
What does it mean when your Insta pot shows you a C7C7 indicates that the heating element has failed, there is not enough liquid, or the quick-release switch is set to vent position. If you get the error after checking the vent release valve and checking to make sure there is the minimum amount of liquid required for pressure, you may need to contact Customer Support. (More info: https://mybudgetrecipes.com/how-to-fix-instant-pot-c7-error-code/ )
Very good instructions, better than what came with the device. I have an older Instant Pot, IP-Duo. Glad it helped! Thanks.I would like more information on the low setting for yogurt please. What temperature does it heat to?
An Instant Pot acts as an incubator for the yogurt, keeping the temperature around 110°F for several hours.
My instapot Duo will not go below 20 minutes, is there a trick to set it on Pressure cook high for 5 minutes?
Hey Jennifer, if you select the Pressure Cook or Manual button, you should be able to adjust the time with - and + keys. This is possible on all Instant Pot models.
we have an Instant pot; 3 quart and in the steaming mode it heats up and pressurized in about 5 min. than a big puff steam all around and pressure is gone.
What do we do wrong
In the saute mode my custom temperatures show as centigrade, at least there is a c after the custom numbers, and I know they are a lot higher than 212 - is there a way to change them to Fahrenheit? I have three choices in saute - high, low and custom.
Hey Susan, which Instant Pot model do you have? You might have to refer to the manual (usually available to download on the official website). The standard models don't have custom temperatures, so I don't really know how to change those.
I found this great! However, I have the Duo Pot with the Air Fryer. Can you tell me if there is a tutorial for that! I have had the pot iout of the box and on the counter now for one year and never used as scared to death as my Mom used a manual regular Pressure Cooker I watched explode when little. I really want to use this wonderful Pot, so hence make it my New Year resolution! Now I just need the help like this tutorial to get it done! Help please! Thanks.
Hi Gail, we don't have a tutorial yet but I actually purchased it for Xmas and have been cooking up recipes for the blog. We'll be launching a category for Duo Crisp + Air Fryer that will have detailed step-by-step instructions, so stay tuned. Roasted chicken and potatoes coming up soon.
Question about the bean/chili button - if actually making chili with dry beans, would you precook the meat then pressure cook according to your directions for the beans or leave the meat raw?
Great question, Jessica. If you're using dry beans, the typical cooking time in Instant Pot is 20 – 25. If using pre-soaked dry beans, the cooking time is more like 10 minutes on HIGH pressure. So, if you want to cook meat and beans as chili together, you just need to make sure the cooking time is enough for both the beans and the meat. I would use either Normal or Less mode for Bean/Chili (depending on the bean type) and use dry beans. That should be 25-30 minutes on HIGH pressure, which is plenty of time for the meat to cook through as well. You can add ground beef, chicken or pork and make sure you add enough liquid for the beans to absorb while cooking. Everything should be cooked through after 25-30 minutes.
I have a instant pot with a bake button how do I use this button Do you also have the crisper air fryer lid?My pot has several competely different buttons:
- no YOGHURT, no DOUGH
- no BEAN/CHILI
- no PRESSURE LEVEL
- no POULTRY
- no KEEP WARM It does have:
- BROWN (instead of SAUTE, I suppose) - which I assume can be used for BOIL
- SIMMER
- BABY FOOD
- REHEAT
- OATMEAL instead of PORRIDGE
and a highly mysterious
- DIY And there was no glass lid supplied with the pot - do you have to order this separately? So please could you help with:
- DIY setting for yoghurt incubation once the starter yoghurt has been added
- best setting for PROOFING DOUGH (maybe using the BAKE button?)
- best (manual) setting for KEEP WARM I bought my Instant Pot this evening: there was only one model in the shop's stock, and others were unavailable to order. I got it principally to cook rice and stews and slow-cooker recipes. But would like to try making yoghurt as I get through a lot of it. Is the KEEP WARM option built in to some settings? -
Hey, are you sure you have the Instant Pot official pot? I don't remember ever seeing those buttons on the real Instant Pot.
We just realized that we used the "pressure cook" button to can proteins, instead of the "Canning" button. The jars all sealed but I was wondering if anyone would know if they would be okay, or if we could put those same filled jars into the "canning" process and process them again?
Hi Nanette, my Instant Pot doesn't have the Canning button but essentially, most buttons activated the pressure cooking method. Some are automatically set to HIGH but others to LOW pressure. To be honest, I am not super familiar with canning so I don't know the answer. Have you tried reaching out directly to the Instant Pot official support team? That might be a good place to start.
Hi Ann,
I'm going to experiment with "sous vide" using my Instapot Duo Nova. I'll be trying this with a chuck steak. I haven't researched the Instapot website yet but I wondered if you might know the temp range for the "keep warm" mode? I think nominal is 135 F. Any recommendations are appreciated.
Thanks
Mike
That's going to be delicious! The keep warm temperature operates at 145 ~ 172°F . This link https://lanaunderpressure.com/2020/02/28/instant-pot-sous-vide-steak-and-tutorial/ has a Youtuber that is really helpful.
the yogurt setting on less mode is what temperature?For “less” mode the temperature ranges from 86 – 93.2°F (30 – 34°C). "Normal” mode temperature is between 96.8 – 109.4°F (36 – 43° C) “More” mode temperature is 160 – 180°F (71 – 83°C).
What does it mean when my instant pot show the P sign and the flame sign, please advise, thank you.
When I first started using it those signs did not appear.
Keep in mind that each model is slightly different. Icon of a pot with the letter P means pressure cooking is in progress. Icon with flame under a pot means the element is heating. Here is a helpful link: https://www.paintthekitchenred.com/instant-pot-symbols-display-panel-icons/
Just found it.I can't thank you enough for this guide! After studying the instructions that came with my IP, I was left clueless about even the core function of steam cooking. Further, I was daunted by the number and array of buttons because, having watched videos showing electronic displays in the cockpit of the F-22 Raptor with a similar array of buttons controlling almost all the aircraft's functions, I assumed that the buttons on the IP similarly executed entire sequences of different steps, merely converting the complexity of precision-guided weapons to highly specialized and similarly complex precision-guided cooking tools. For example, I figured that the Yogurt button would take the centuries-old simplistic way of making yogurt and break it down into, say, 12 precise steps, each representing a single distinct element of the process of transforming raw ingredients to finished product. The IP's cooking action would be adjusted to optimize the step. Such precision would enable the most inexperienced home user tall enough to operate it (child safety!) to exactly replicate yogurt made in the centuries-old simplistic way. Thanks to you, I now understand how simple each button is, especially compared to the F-22's, although there is a slightly disconcerting difference, which is the lack of an ejection seat. (I've written to the company several times, but for some reason I haven't heard back from them. But I digress.) Now that I have benefited enormously from this article, and discovered so much more information and assistance, I have to praise your site for representing the very best of what the Internet can achieve. You've used its capabilities to share your knowledge, skills, experience, imagination, and passion with the whole world of people who may be able to gain from them but would otherwise have no access for not being within your community. You are generously contributing what's obviously a huge amount of time and effort (not to mention the money for a Level A+ website) to the world's "knowledge base of life" and making the planet just a little bit better for it. Thank you.
Wow! Thank you so much! We are so glad this guide helped you. We truly want everyone to enjoy cooking with their IP without being frustrated with the learning curve at the beginning.
Very helpful article! On the Face Book pages, there is very little mention of the special settings, which is a bit disappointing. I'm so glad I came across your article, now I have a much better idea of how to utilize my IP to its maximum potential.
Milk is already pasteurized unless you're buying raw milk. Why do you say that heating it to make yogurt is 'pasteurizing it?
Such good helpful information in article! I’m new to instant pot and knew absolutely nothing before reading article. Easy to understand , written clearly with novice to expert in mind. Thank you!
This is a wonderful article! So much useful information and clear explanations. Thank you for all the work that went into writing this down, it is VERY helpful!
This is BY FAR the best info on the Instant Pot I’ve ever come across! I commend you!
InstantPot should let you write their manuals!
Well done and THANK YOU.
Did you do something similar for the Instant Vortex Airfryer?
Kind regards
Bentjie
This is probably a stupid question, but is there a way to print this article? I NEED to have a copy of this in my kitchen! I just recently had to replace my old electronic pressure cooker with a 10 qt. Instant Pot, and I REALLHY need to have some kind of a cheat sheet in my kitchen! This is the closest I've found and would love to have this printed out.
Hi Deb, We are actually working on a Print-friendly PDF for this article, so it will soon be up this post. In the meantime, the easiest way to print this would be to use the Print function from your browser but it doesn't format the page very nicely. Stay tuned, we will soon have a PDF version available. Irena
Hello, my instant pot has both a pressure button and a manual button. What is the difference? Thanks so much for your helpful guide. I’ve always considered myself good at reading and understanding manuals, but not anymore after getting an instant pot! It’s crazy how small important details are not explained.

We are a team of food enthusiasts, chefs and cookbook authors. On this blog we share a variety of Instant Pot recipes catered to different diets, budgets and needs, as well as roundups of our favourite dishes and ideas from around the web. You can find our Instant Pot 101 series here, which are useful for anyone mastering their new pressure cooker.